Let’s make an e-commerce shopping cart in Vue.js 3 using Vuex and Web Storage to save the items in the browser for the next session after the user closes the website.
Sometimes when we develop an online store, we don’t want to save the cart items on the database on the server or make backend calls unless there is an order for checkout or when the user login. Vue.js make it easy and really helpful to do that type of shopping cart.
I have Vite Vue 3 project with Bootstrap 5 and Vue-router. Because I respect your time, here are the links below for setting up the project. If you are familiar with that skip them and let’s focus on building the shopping cart.


Here are the Vue Router links that we will use, for more information, you can see this tutorial: How To Make Layouts In Vue 3 Application
import { createRouter, createWebHistory } from 'vue-router'
import Home from '/src/views/Home.vue'
import About from '/src/views/About.vue'
import Cart from '/src/views/Cart.vue'
import DefaultLayout from '/src/layouts/DefaultLayout.vue'
const routes = [
    {
        path:'/',
        name:'Public',
        component:DefaultLayout,
        redirect: '/',
        children:[
            {
                path:'/',
                name:'Home',
                component:Home
            },
            {
                path:'/about',
                name:'About',
                component:About
            },
            {
                path:'/cart',
                name:'Cart',
                component:Cart
            }
        ]
    },
]
const router = createRouter({
    history: createWebHistory(),
    routes,
})
export default router
Vuex Shopping Cart
We need to install Vuex, the state management library for Vue.js, and create a store for saving the cart items.
npm install vuex@next --saveNow, Let’s create the store with cart functions. in src\store\index.js (Create the file if not exists)
import { createStore } from 'vuex'
/* eslint-disable */
export default createStore({
  state: {
    cart:[],
    cartTotal:0,
  },
  mutations: {

   async initialiseStore(state) {
         if(localStorage.getItem('cart')){
          state.cart = JSON.parse(localStorage.getItem('cart'))
         }
         if(localStorage.getItem('cartTotal')){
         state.cartTotal = parseFloat(localStorage.getItem('cartTotal'))
         }
         return true;
    },
    addRemoveCart(state,payload){

      //add or remove item
      payload.toAdd?
      state.cart.push(payload.product):
      state.cart = state.cart.filter(function( obj ) {
        return obj.id !== payload.product.id;
      });

      //calculating the total
      state.cartTotal = state.cart.reduce((accumulator, object) => {

        return parseFloat(accumulator) + parseFloat(object.price*object.qty);
      }, 0);

       //saving in web storage
      localStorage.setItem('cartTotal',JSON.stringify(state.cartTotal));
      localStorage.setItem('cart',JSON.stringify(state.cart));
    },
    updateCart(state,payload){
         //update quantity
        state.cart.find(o => o.id ===  payload.product.id).qty = payload.product.qty;

       //calculating the total
        state.cartTotal = state.cart.reduce((accumulator, object) => {
          return parseFloat(accumulator) + parseFloat(object.price*object.qty);
        }, 0);

      //saving in web storage
        localStorage.setItem('cartTotal',JSON.stringify(state.cartTotal));
        localStorage.setItem('cart',JSON.stringify(state.cart));
      },
  },
  actions: {},
  modules: {},
})
This is the Vuex store, we have in state cart array for saving the cart’s items and cartTotal for keeping the cart total.
In mutations we have two functions the first one addRemoveCart for adding or removing items from the cart and calculating the total and the second one updateCart for updating the item quantity and calculating the total after updating.
We save the cart items in web storage using “localStorage” object so that if the user closed the website, he doesn’t lose the item cart and we can load the items by “initialiseStore” function that we call when the app starts.
Now, let’s add the store to our app src\main.js so that we can use it.
import { createApp } from 'vue'
//
import store from "./store"
//
createApp(App).use(head).use(router).use(store).mount('#app')
For loading our cart data we start the app we need to add “initialiseStore” function to src\App.vue
<template>
<router-view/>
</template>

<script>
export default ({
  async mounted() {
   await this.$store.commit('initialiseStore')
  },
})
</script>
Add To Cart Button
We will make a cart button component for adding and removing items in addition to increasing or decreasing the quantity. We need to install “vue3-toastify” package for making toast notifications.
npm install --save vue3-toastifyAfter finishing the installation, let’s create src\components\CartAddRemove.vue file for making plus and minus buttons for quantity.
<template>
    <div v-if="product"  class="input-group plus-minus">
        <button class="btn btn-outline-secondary " :class="loading?'disabled':''" @click="addOrRemove(-1)" type="button" id="button-addon1">-</button>
            <input type="number" v-model="qty"  disabled class="form-control form-control-sm" placeholder="" aria-label="Example text with button addon" aria-describedby="button-addon1">
        <button class="btn btn-outline-secondary" :class="loading?'disabled':''"  @click="addOrRemove(1)" type="button" id="button-addon1">+</button>
    </div>
 </template>
 <script>
 import { toast } from 'vue3-toastify';
 import 'vue3-toastify/dist/index.css';
 export default{
    name:'CartAddRemove',
     props:['product'],
     data(){
         return{
             qty:1,
             loading:false
         }
     },
     methods:{
        async addOrRemove(number){
            this.loading = true
            if(number == 1){
                if(this.qty < 10){
                this.qty++
                this.product.qty = this.qty
                await this.$store.commit('updateCart',{product:this.product})
                    toast.success('cart updated', {
                        autoClose: 1000,
                    });
                }else{
                    toast.warning('You reached the limit', {
                        autoClose: 3000,
                    });
                }
            }
            if(number == -1){
                if(this.qty > 1){
                    this.qty--
                    this.product.qty = this.qty
                    await this.$store.commit('updateCart',{product:this.product})
                    toast.success('cart updated', {
                            autoClose: 1000,
                    });
                }else{
                    toast.warning('You reached the limit', {
                        autoClose: 3000,
                    });
                }
            }
            this.loading = false
         }
     },
     mounted(){
         this.qty = this.product.qty
     }
 }
 </script>
 <style>
.plus-minus input{
    max-width: 50px;
}
</style>
Let’s explain, We use bootstrap group input for creating add and minus buttons and on click, we run “addOrRemove” function with 1 for increasing quantity by 1 and -1 for decreasing quantity by one and we have limits that are maximum 10 and minimum 1 and we show a toast warning notification for that.
this.$store.commit('updateCart',{product:this.product}) it’s for updating the cart item quantity in the store and localStorage.
Let’s create another component src\components\CartBTN.vue for adding an item or removing an item from the cart. And inside that component, we will use CartAddRemove.vue component that we just made.
<template>
    <button type="button" @click="addOrRemove()" class="cart-btn btn btn-sm btn-outline-secondary me-2">
    <i :class="toAdd?'bi bi-cart':'bi bi-cart-check'"></i>
    </button>
     <CartAddRemove v-if="!toAdd" :product="item"/>
 </template>

 <script>
 import CartAddRemove from './CartAddRemove.vue';
 import { toast } from 'vue3-toastify';
 import 'vue3-toastify/dist/index.css';
 export default{
     props:['product'],
     components :{CartAddRemove},
     data(){
         return{
             toAdd:true,
             item:[]
         }
     },
     methods:{
        async addOrRemove(){
                this.item.qty = 1
                this.$store.commit('addRemoveCart',{product:this.item,toAdd:this.toAdd})
                let toasMSG;
                this.toAdd?
toasMSG = 'Added to cart' :  toasMSG = 'Removed from cart'
                toast(toasMSG, {
                autoClose: 1000,
                });
                this.toAdd = !this.toAdd
         }
     },
     mounted(){
         console.log(this.$store.state.cart)
         let cart = this.$store.state.cart
         let obj = cart.find(o => o.id ===  this.product.id);
         if(obj) {
            this.toAdd=false
            this.item = obj
         }
         else{
            this.item = this.product
            this.toAdd=true
         }
     }
 }
 </script>
 <style>
 .cart-btn{
   width:40px;
   height: 38px;
 }
.plus-minus input{
    max-width: 50px;
}
</style>
That above is the component we will use inside a product card for the page as add to cart button we pass the product object to it and it will pass it to CartAddRemove. By default, the quantity will be one and in mounted function we check if the item exists in the cart so that we can decide to show add or remove buttons.
Using The Shopping Cart Button
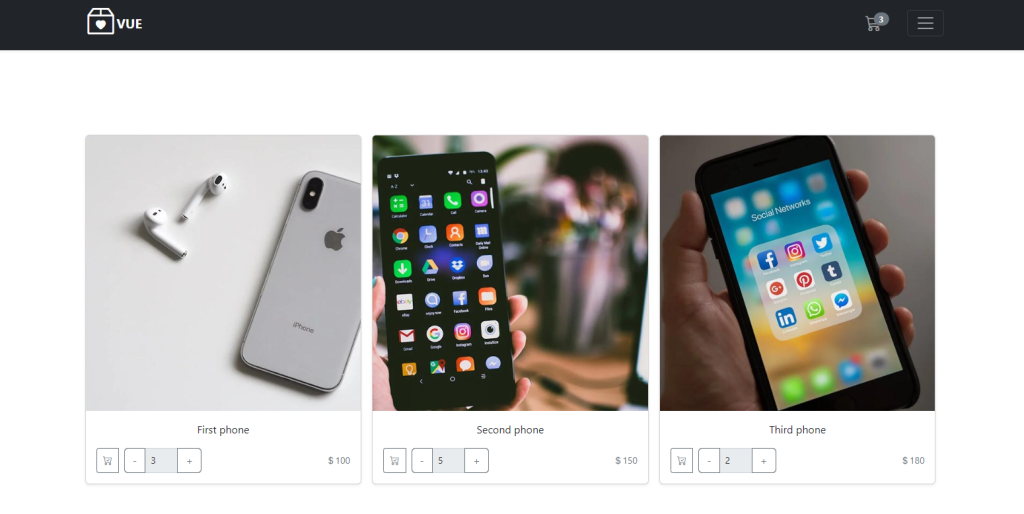
Here is the home page that displays the products src\views\Home.vue
<template>
    <div class="container min-h-content py-5 text-center">
        <div class="row py-lg-5">
            <div class="row row-cols-1 row-cols-sm-2 row-cols-md-3 g-3">
                <div class="col" v-for="product in products"  :key="product.id">
                    <div class="card shadow-sm">
                        <img class="bd-placeholder-img card-img-top" width="100%"  :src="product.image" alt="">
                        <div class="card-body">
                        <p class="card-text">{{ product.name }}</p>
                        <div class="d-flex justify-content-between align-items-center">
                            <div class="btn-group">
                                <CartBTN :product="product"/>
                            </div>
                            <small class="text-muted"><i class="bi bi-currency-dollar"></i>{{ product.price }}</small>
                        </div>
                        </div>
                    </div>
                </div>
            </div>
        </div>
    </div>
</template>
<script>
import CartBTN from '../components/CartBTN.vue'
export default {

    setup() {

    },
    components :{CartBTN},
    data(){
        return{
            products:[
                {id:1, name:'First phone',image:'http://localhost:5173/img/phone1.jpg', price:100},
                {id:2, name:'Second phone',image:'http://localhost:5173/img/phone2.jpg', price:150},
                {id:3, name:'Third phone',image:'http://localhost:5173/img/phone3.jpg', price:180},
            ]
        }
    }

}
</script>
We have an array of product objects with id, name, image URL, and price to display. To show the cart icon in the header with the cart items number, here is the code below.
 <ul class="navbar-nav ms-auto mb-2 mb-lg-0">
        <li class="nav-item me-3">
          <router-link class="nav-link" :class="$route.name == 'Cart'? 'active':''" aria-current="page" :to="{ name: 'Cart' }">
            <i class="bi bi-cart3 h4"></i>
            <span v-if="$store.state.cart.length > 0" class="align-items-center justify-content-center translate-middle badge rounded-pill bg-secondary">
              {{ $store.state.cart.length }}
            </span>
          </router-link>
        </li>
</ul>
Cart page
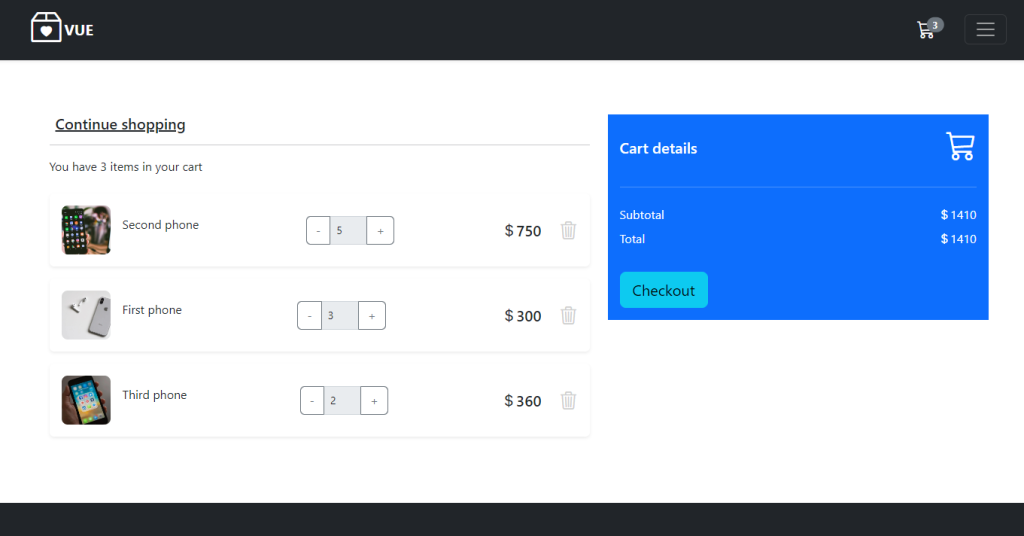
The cart page src\views\Cart.vue is the last step in this tutorial. I know e-commerce websites are complicated but it is worth learning.
<template>
<section class="h-100 h-custom" >
<div class="container py-5 h-100">
<div class="row d-flex justify-content-center align-items-center h-100">
    <div class="col">
    <div class="card border-0">
        <div class="card-body p-4">

        <div class="row">
            <div class="col-lg-7">
            <h5 class="mb-3"><router-link :to="{name:'Home'}" class="text-body"><i
                    class="fas fa-long-arrow-alt-left me-2"></i>Continue shopping</router-link></h5>
            <hr>

            <div class="d-flex justify-content-between align-items-center mb-4">
                <div>
                <p class="mb-0">You have {{ $store.state.cart.length }} items in your cart</p>
                </div>
            </div>

            <div v-for="item in $store.state.cart" class="card mb-3 shadow-sm border-0" :key="item.id">
                <div class="card-body">
                <div class="d-flex justify-content-between">
                    <div class="d-flex flex-row align-items-center">
                        <div>
                            <img
                            :src="item.image"
                            class="img-fluid rounded-3" alt="Shopping item" style="width: 65px;">
                        </div>
                        <div class="ms-3">
                            <p>{{ item.name }}</p>
                        </div>
                    </div>
                    <div class="d-flex flex-row align-items-center">
                        <div >
                            <CartAddRemove :product="item"/>
                        </div>
                    </div>
                    <div class="d-flex flex-row align-items-center">
                        <div >
                            <h5 class="mb-0"><i class="bi bi-currency-dollar"></i>{{ item.price*item.qty }}</h5>
                            <small v-if="item.hasDiscount" class="text-muted text-decoration-line-through"><i class="bi bi-currency-dollar"></i>{{ item.price}}</small>
                        </div>
                        <a role="button" @click="removeItem(item)" class="ms-4" style="color: #cecece;"><i class="bi bi-trash3 h4"></i></a>
                    </div>
                </div>
                </div>
            </div>

            </div>
            <div class="col-lg-5">

            <div class="card bg-primary text-white rounded-0 border-0">
                <div class="card-body">
                <div class="d-flex justify-content-between align-items-center mb-4">
                    <h5 class="mb-0">Cart details</h5>
                    <i class="bi bi-cart3 h1"></i>
                </div>
                <hr class="my-4">
                <div class="d-flex justify-content-between">
                    <p class="mb-2">Subtotal</p>
                    <p class="mb-2"><i class="bi bi-currency-dollar"></i>{{ $store.state.cartTotal }}</p>
                </div>
                <div class="d-flex justify-content-between mb-4">
                    <p class="mb-2">Total</p>
                    <p class="mb-2"><i class="bi bi-currency-dollar"></i>{{ $store.state.cartTotal }}</p>
                </div>

                <button type="button" class="btn btn-info btn-block btn-lg">
                    Checkout
                </button>

                </div>
            </div>

            </div>

        </div>

        </div>
    </div>
    </div>
</div>
</div>
</section>
</template>
<script>
import CartAddRemove from '../components/CartAddRemove.vue';
export default{
components :{CartAddRemove},
methods:{
    removeItem(item){
        this.$store.commit('addRemoveCart',{product:item,toAdd:false})
    },
},
mounted(){

}

}
</script>
As you can see here we get the cart items for the Vuex store directly without needing any codes as well as the cart total. and we created a new button for removing the cart item, we used the CartAddRemove component so, the users can increase and decrease the items as they want.
Here is the project repository on GitHub
That’s all, I hope that was useful for you, thank you.
