
Guide Tutorial for creating controllers and routes quickly, we will focus on the code for a quick start to develop your Nest application.
Creating a New NestJS Project
We need Node.js and NPM installed on our machine to install Nest CLI to ease the process.
npm i -g @nestjs/cliIf you want to know the available commands for Nest CLI use nest -h in the terminal
Let’s scaffold our project
nest new my-blogAfter selecting the package manager and finishing the installation go to the installation folder and run the application
cd my-blog
npm run start
Go to http://localhost:3000/, you should see “Hello World!” if you want to change the server port. Open src\main.ts and change the app.listen in the bootstrap() function
import { NestFactory } from '@nestjs/core';
import { AppModule } from './app.module';

async function bootstrap() {
  const app = await NestFactory.create(AppModule);
  await app.listen(3000); //change the port form 3000 to 3001
}
bootstrap();
Before we go to the next step we need to remove these files
src\app.controller.spec.tssrc\app.controller.tssrc\app.service.ts
Let’s remove these file form src\app.module.ts
import { Module } from '@nestjs/common';

@Module({
  imports: [],
  controllers: [],
  providers: [],
})
export class AppModule {}
Now we have a clean app, let’s create our first controller
NestJS Controller
Let’s create a controller for a blog module. we will use the NestJS command nest generate controller blog but in a short format
nest g co blogIt creates a new folder src\blog with src\blog\blog.controller.spec.ts and src\blog\blog.controller.ts
Looks good, this is the controller code.
import { Controller } from '@nestjs/common';

@Controller('blog')
export class BlogController {}
This command adds the controller to src\app.module.ts. we should create a module for the blog but for now, we will use it like it is.
import { Module } from '@nestjs/common';
import { BlogController } from './blog/blog.controller';

@Module({
  imports: [],
  controllers: [BlogController],
  providers: [],
})
export class AppModule {}
Let’s create our first route.
NestJS Routes
In NestJs we don’t create the routes separately “We don’t do that here”
We use routes decorators inside controllers, such as @Get(), @Post and @Put before the controller functions. Let’s create a route for getting all the blog posts in our blog controller
import { Controller, Get } from '@nestjs/common';

@Controller('blog')
export class BlogController {
  private posts = [
    {id:1, title:'post one', description:'the body of the post one' },
    {id:2, title:'post two', description:'the body of the post two' },
    {id:3, title:'post three', description:'the body of the post three'},
    ];

  @Get()
  findAll() {
    return this.posts;
  }

}
@Controller('blog') : this decorator for defining a controller with an entry point to all the sub-routes. In this example here, the route should be http://localhost:3000/blog and we made the entry point to call findAll() by using the @Get() decorator that we import from @nestjs/common.
Notice that @Get() is exactly like @Get('/').
Route Parameters
Let’s create a function for getting the posts by id in the blog controller, We will use the @Param decorator for getting the parameters as in the following example.
import { Controller,
Param, Get } from '@nestjs/common';
//
@Get(':id')
findOne(@Param('id') id: string) {
    return this.posts.find(o => o.id === id);
}
Now if you open the browser and go to http://localhost:3000/blog/1 it will show the post with id 1.
What if we want to add multiple parameters to the URL? Let’s create a search URL that takes 2 parameters the first for the column (‘title’ or ‘description’) and the second for the search value.
@Get('search/:column/:search')
search(@Param('search') search: string, @Param('column') column: string) {
    return this.posts.find(o => o[column] === search);
}
Try to visit http://localhost:3000/blog/search/title/post%20two it should return the second post.
Route Query
If you want to add more filters to an URL, Queries are the best options. Let’s add more filters in findAll() such as sorting by id asc for ascending and desc for descending
 @Get()
  findAll(@Query('sort') sort) {
    //return this.posts;
    return {sort: sort};
 }
Let’s test the route by visiting http://localhost:3000/blog?sort=asc
NestJS Request Body
Let’s create another example for adding a new blog post. We will create a function with a post route with a request payload. we will use the @Body decorator for getting the body data.
We need to create a Data Transfer Object schema (DTO), A DTO is an object that defines how the data will be sent over the network. It’s like making TypeScript interfaces. We will put all the DTO files in the new “dto” folder src\blog\dto. Let’s create the first DTO for creating a new post src\blog\dto\create-post.dto.ts
export class CreatePostDto {
    id: string;
    title: string;
    description: string;
}
Now we are ready to create our function.
import { Controller, Param, Get, Query, Post, Body } from '@nestjs/common';
import { CreatePostDto } from './dto/create-post.dto';
//
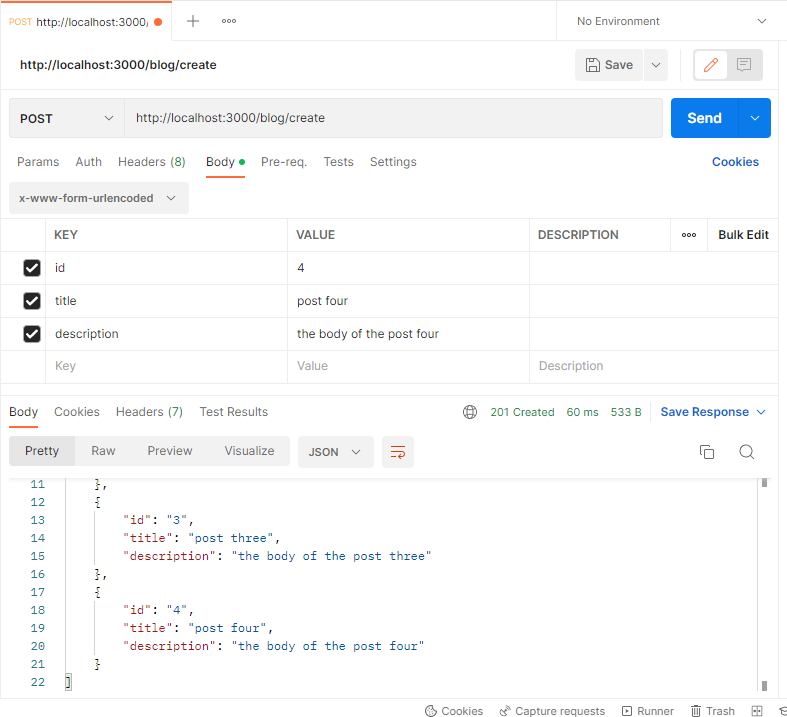
@Post('create')
create(@Body() createPostDto: CreatePostDto){
this.posts.push(createPostDto);
return this.posts
}Let’s try to send a post request, I’m using postman, and make sure we send the body as “x-www-form-urlencoded”.
More Request Methods
In the above examples, we got all the basics we need to know about creating routes, and for other request methods such as Put, Delete, and Patch, they will be the same but here is one more example for Put and Delete routes.
Let’s create DTO for updating a post by id
export class UpdatePostDto {
    id: string;
    title: string;
    description: string;
}
Here is the controller
import { Controller, Param, Get, Query, Post, Body, Put, Delete } from '@nestjs/common';
import { UpdatePostDto } from './dto/update-post.dto';
//

@Put(':id')
update(@Param('id') id: string, @Body() updatePostDto: UpdatePostDto) {
  console.log(updatePostDto)
  return `This action updates a #${id} post`;
}
Here is a delete function too
@Delete(':id')
remove(@Param('id') id: string) {
  return `This action delete a #${id} post`;
}
DTO with Route Queries
Instead of defining every single query, we can create a DTO class and use the queries as properties of one object.
export class FilterPostsDto {
    sort: string;
    status: string;
}
import { Controller, Param, Get, Query, Post, Body, Put, Delete } from '@nestjs/common';
//
import { FilterPostsDto } from './dto/filter-posts.dto';
@Get('filter/posts')
filterPosts(@Query() query: FilterPostsDto) {
return `This filter is for sort with # ${query.sort} and status # ${query.status} post`;
}Conclusion
NestJS takes the controllers to a new way of use. That is what I felt when I had to deal with a NestJS project couple of months ago. We will miss the routes file but it’s okay, we have decorators for every request method and DTO for the request body and @Query for queries, and @Param for route parameters.
Here is the controller code
import { Controller, Param, Get, Query, Post, Body, Put, Delete } from '@nestjs/common';
import { CreatePostDto } from './dto/create-post.dto';
import { UpdatePostDto } from './dto/update-post.dto';
import { FilterPostsDto } from './dto/filter-posts.dto';
@Controller('blog')
export class BlogController {
  private posts = [
    {id:"1", title:'post one', description:'the body of the post one' },
    {id:"2", title:'post two', description:'the body of the post two' },
    {id:"3", title:'post three', description:'the body of the post three'},
    ];

  @Get()
  findAll(@Query('sort') sort) {
    //return this.posts;
    return {sort: sort};
  }

  @Get(':id')
  findOne(@Param('id') id: string) {
    return this.posts.find(o => o.id === id);
  }

  @Get('search/:column/:search')
  search(@Param('search') search: string, @Param('column') column: string) {
    return this.posts.find(o => o[column] === search);
  }

  @Post('create')
  create(@Body() createPostDto: CreatePostDto){
    console.log(createPostDto)
     this.posts.push(createPostDto);
     return this.posts
  }

  @Put(':id')
  update(@Param('id') id: string, @Body() updatePostDto: UpdatePostDto) {
    console.log(updatePostDto)
    return `This action updates a #${id} post`;
  }

  @Delete(':id')
  remove(@Param('id') id: string) {
    return `This action delete a #${id} post`;
  }

  @Get('filter/posts')
  filterPosts(@Query() query: FilterPostsDto) {
    return `This filter is for sort with # ${query.sort} and status # ${query.status}  post`;
  }


}
That’s all, I hope that was useful for you, thank you.